# ReactiveProperty
ReactiveProperty is the core class of this library.
This has following features.
- Implements the
INotifyPropertyChangedinterface.- The value property raise the
PropertyChangedevent.
- The value property raise the
- Implements the
IObservable<T>interface.
Yes, The value property can bind to XAML control's property.
And the class call the IObserver<T>#OnNext method when the value is set.
A sample code is as below.
using Reactive.Bindings;
using System;

namespace ReactivePropertyEduApp
{
    class Program
    {
        static void Main(string[] args)
        {
            // create from defualt constructor(default value is null)
            var name = new ReactiveProperty<string>();
            // setup the event handler and the onNext callback.
            name.PropertyChanged += (_, e) => Console.WriteLine($"PropertyChanged: {e.PropertyName}");
            name.Subscribe(x => Console.WriteLine($"OnNext: {x}"));

            // update the value property.
            name.Value = "neuecc";
            name.Value = "xin9le";
            name.Value = "okazuki";
        }
    }
}
The output of this program is below.
OnNext:
OnNext: neuecc
PropertyChanged: Value
OnNext: xin9le
PropertyChanged: Value
OnNext: okazuki
PropertyChanged: Value
What's different between PropertyChanged and onNext callback?
The onNext callback is called when subscribed. The PropertyChanged isn't called when the event handler is added. And the onNext callback's argument is the property value, the PropertyChanged argument doesn't have the property value.
The PropertyChanged event was provided for data binding. In the normal case, you should use Reactive Extensions methods.
# Use with XAML platform
The ReactiveProperty class is designed for XAML platform which is like WPF, UWP, and Xamarin.Forms.
This class can be used a ViewModel layer.
In the case that you don't use the ReactiveProperty, a ViewModel class wrote below.
public class MainPageViewModel : INotifyPropertyChanged
{
    public event PropertyChangedEventHandler PropertyChanged;

    private string _name;
    public string Name
    {
        get => _name;
        set
        {
            _name = value;
            PropertyChanged?.Invoke(this, new PropertyChangedEventArgs(nameof(Name)));
        }
    }

    // Other properties are defined similar codes.
}
And those properties bind in the XAML code.
<!-- In the WPF -->
<TextBox Text="{Binding Name}" />

<!-- In the UWP(Runtime data binding) -->
<TextBox Text="{Binding Name}" />

<!-- In the UWP(Compile time data binding) -->
<TextBox Text="{x:Bind ViewModel.Name, Mode=TwoWay}" />

<!-- In the Xamarin.Forms -->
<Entry Text="{Binding Name}" />
In the case that you use the ReactiveProperty, a ViewModel code becomes very simple!
// The INotifyPropertyChanged interface must implement when using the WPF.
// Because, if you don't implement this, then memory leak occurred.
public class MainPageViewModel
{
    public ReactiveProperty<string> Name { get; } = new ReactiveProperty<string>();

    // Other properties are defined similar codes.
}
When binding in the XAML code, you must add the .Value in binding path.
This is the only limitation of this library.
<!-- In the WPF -->
<TextBox Text="{Binding Name.Value}" />

<!-- In the UWP(Runtime data binding) -->
<TextBox Text="{Binding Name.Value}" />

<!-- In the UWP(Compile time data binding) -->
<TextBox Text="{x:Bind ViewModel.Name.Value, Mode=TwoWay}" />

<!-- In the Xamarin.Forms -->
<Entry Text="{Binding Name.Value}" />
We forget the
.Valuesometimes. If you have a ReSharper license, then you can use this plugin. ReactiveProperty XAML Binding Corrector Highlight the missing of ReactiveProperty ".Value" in XAML.
# How to create a ReactiveProperty instance
The ReactiveProperty class can create from many methods.
# Create from the constructor
The simplest way is using the constructor.
// create with the default value.
var name = new ReactiveProperty<string>();
Console.WriteLine(name.Value); // -> empty output

// create with the initial value.
var name = new ReactiveProperty<string>("okazuki");
Console.WriteLine(name.Value); // -> okazuki
# Create from IObservable<T>
This can created from IObservable<T>.
Just calls ToReactiveProperty method.
IObservable<long> observableInstance = Observable.Interval(TimeSpan.FromSeconds(1));

// Convert to ReactiveProperty from IObservable.
ReactiveProperty<long> counter = observableInstance.ToReactiveProperty();
# Create from ReactiveProperty
ReactiveProperty implements the IObservable interface.
This means that ReactiveProperty can be created from ReactiveProperty.
var name = new ReactiveProperty<string>("");

var formalName = name.Select(x => $"Dear {x}")
    .ToReactiveProperty();
All IObservable instances can become ReactiveProperty.
# Validation
The ReactiveProperty class implements INotifyDataErrorInfo interface.
# Set custom validation logic
You can set custom validation logic using the SetValidateNotifyError method.
var name = new ReactiveProperty<string>()
    .SetValidateNotifyError(x => string.IsNullOrWhiteSpace(x) ? "Error message" : null);
In the correct value case, validation logic should return null. In invalid value case, logic should return an error message.
# Work with DataAnnotations
This class can work together with the DataAnnotations.
You can set validation attribute using the SetValidateAttribute method.
class ViewModel
{
    // Set validation attributes
    [Required(ErrorMessage = "The name is required.")]
    [StringLength(100, ErrorMessage = "The name length should be lower than 30.")]
    public ReactiveProperty<string> Name { get; }

    public ViewModel()
    {
        Name = new ReactiveProperty<string>()
            // Set validation attributes into the ReactiveProperty.
            .SetValidateAttribute(() => Name);
    }
}
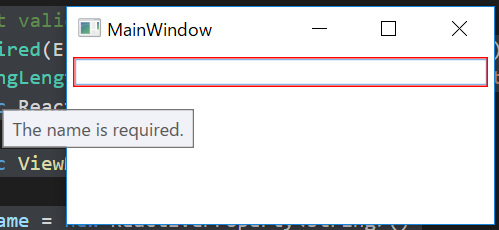
WPF is integrated with INotifyDataErrorInfo interface. See below.
# Handling validation errors
Another platform can't display error messages from the INofityDataErrorInfo interface.
ReactiveProperty class have some properties for handling validation errors.
A first property is ObserveErrorChanged.
This type is IObservable<IEnumerable>. You can convert to an error message from IEnumerable. See below.
class ViewModel
{
    // Set validation attributes
    [Required(ErrorMessage = "The name is required.")]
    [StringLength(100, ErrorMessage = "The name length should be lower than 30.")]
    public ReactiveProperty<string> Name { get; }

    public ReadOnlyReactiveProperty<string> NameErrorMessage { get; }

    public ViewModel()
    {
        Name = new ReactiveProperty<string>()
            // Set validation attributes into the ReactiveProperty.
            .SetValidateAttribute(() => Name);

        // Handling an error message
        NameErrorMessage = Name.ObserveErrorChanged
            .Select(x => x?.OfType<string>()?.FirstOrDefault())
            .ToReadOnlyReactiveProperty();
    }
}
Bind NameErrorMessage.Value property to a text control. An error message can be displayed.
In the case of UWP, see below.
public sealed partial class MainPage : Page
{
    private ViewModel ViewModel { get; } = new ViewModel();
    public MainPage()
    {
        this.InitializeComponent();
    }
}
<Page x:Class="App1.MainPage"
      xmlns="http://schemas.microsoft.com/winfx/2006/xaml/presentation"
      xmlns:x="http://schemas.microsoft.com/winfx/2006/xaml"
      xmlns:local="using:App1"
      xmlns:d="http://schemas.microsoft.com/expression/blend/2008"
      xmlns:mc="http://schemas.openxmlformats.org/markup-compatibility/2006"
      mc:Ignorable="d">
    <StackPanel Background="{ThemeResource ApplicationPageBackgroundThemeBrush}">
        <TextBlock Text="Name"
                   Style="{ThemeResource CaptionTextBlockStyle}" />
        <TextBox Text="{x:Bind ViewModel.Name.Value, Mode=TwoWay, UpdateSourceTrigger=PropertyChanged}"
                 Margin="5" />
        <TextBlock Text="{x:Bind ViewModel.NameErrorMessage.Value, Mode=OneWay}"
                   Foreground="Red"
                   Margin="5,0"
                   Style="{ThemeResource BodyTextBlockStyle}" />
    </StackPanel>
</Page>

ReactiveProperty v7.0.0 or later, there is ObserveValidationErrorMessage extension method instead of ObserveErrorChanged.Select(x => x?.OfType<string>()?.FirstOrDefault()). The above code is as below:
class ViewModel
{
    // Set validation attributes
    [Required(ErrorMessage = "The name is required.")]
    [StringLength(100, ErrorMessage = "The name length should be lower than 30.")]
    public ReactiveProperty<string> Name { get; }

    public ReadOnlyReactiveProperty<string> NameErrorMessage { get; }

    public ViewModel()
    {
        Name = new ReactiveProperty<string>()
            // Set validation attributes into the ReactiveProperty.
            .SetValidateAttribute(() => Name);

        // Handling an error message
        NameErrorMessage = Name.ObserveValidationErrorMessage()
            .ToReadOnlyReactiveProperty();
    }
}
Next property is ObserveHasErrors. ObserveHasErrors property type is IObservable<bool>.
In the popular input form case, combining ObserveHasErrors property values is very useful.
This sample program creates the HasErrors property that is of type ReactiveProperty<bool> that combine two ReactiveProperty's ObserveHasErrors properties.
public class ViewModel
{
    // Set validation attributes
    [Required(ErrorMessage = "The name is required.")]
    [StringLength(100, ErrorMessage = "The name length should be lower than 30.")]
    public ReactiveProperty<string> Name { get; }

    [Required(ErrorMessage = "The memo is required.")]
    public ReactiveProperty<string> Memo { get; }

    public ReadOnlyReactiveProperty<bool> HasErrors { get; }

    public ViewModel()
    {
        Name = new ReactiveProperty<string>()
            .SetValidateAttribute(() => Name);

        Memo = new ReactiveProperty<string>()
            .SetValidateAttribute(() => Memo);

        // You can combine some ObserveHasErrors values.
        HasErrors = new[]
            {
                Name.ObserveHasErrors,
                Memo.ObserveHasErrors,
            }.CombineLatest(x => x.Any(y => y))
            .ToReadOnlyReactiveProperty();
    }
}
<Page x:Class="App1.MainPage"
      xmlns="http://schemas.microsoft.com/winfx/2006/xaml/presentation"
      xmlns:x="http://schemas.microsoft.com/winfx/2006/xaml"
      xmlns:local="using:App1"
      xmlns:d="http://schemas.microsoft.com/expression/blend/2008"
      xmlns:mc="http://schemas.openxmlformats.org/markup-compatibility/2006"
      mc:Ignorable="d">
    <StackPanel Background="{ThemeResource ApplicationPageBackgroundThemeBrush}">
        <TextBlock Text="Name"
                   Style="{ThemeResource CaptionTextBlockStyle}"
                   Margin="5" />
        <TextBox Text="{x:Bind ViewModel.Name.Value, Mode=TwoWay, UpdateSourceTrigger=PropertyChanged}"
                 Margin="5" />
        <TextBlock Text="Memo"
                   Style="{ThemeResource CaptionTextBlockStyle}"
                   Margin="5" />
        <TextBox Text="{x:Bind ViewModel.Memo.Value, Mode=TwoWay, UpdateSourceTrigger=PropertyChanged}"
                 Margin="5" />
        <TextBlock Text="HasErrors"
                   Style="{ThemeResource CaptionTextBlockStyle}"
                   Margin="5" />
        <CheckBox IsChecked="{x:Bind ViewModel.HasErrors.Value, Mode=OneWay}"
                  IsEnabled="False"
                  Margin="5" />
    </StackPanel>
</Page>


The last property is HasErrors. It is a just bool property.
public class ViewModel
{
    // Set validation attributes
    [Required(ErrorMessage = "The name is required.")]
    [StringLength(100, ErrorMessage = "The name length should be lower than 30.")]
    public ReactiveProperty<string> Name { get; }

    public ViewModel()
    {
        Name = new ReactiveProperty<string>()
            .SetValidateAttribute(() => Name);
    }

    public void DoSomething()
    {
        if (Name.HasErrors)
        {
            // invalid value case
        }
        else
        {
            // valid value case
        }
    }
}
# Don't need an initial validation error
In default behavior, ReactiveProperty reports errors when validation logic is set.
If you don't need initial validation errors, then you can skip the error.
Just call the Skip method.
class ViewModel
{
    // Set validation attributes
    [Required(ErrorMessage = "The name is required.")]
    [StringLength(100, ErrorMessage = "The name length should be lower than 30.")]
    public ReactiveProperty<string> Name { get; }

    public ReadOnlyReactiveProperty<string> NameErrorMessage { get; }

    public ViewModel()
    {
        Name = new ReactiveProperty<string>()
            .SetValidateAttribute(() => Name);

        // Handling an error message
        NameErrorMessage = Name.ObserveErrorChanged
            .Skip(1) // Skip the first error.
            .Select(x => x?.OfType<string>()?.FirstOrDefault())
            .ToReadOnlyReactiveProperty();
    }
}
Or set IgnoreInitialValidationError flag in the constructor:
class ViewModel
{
    // Set validation attributes
    [Required(ErrorMessage = "The name is required.")]
    [StringLength(100, ErrorMessage = "The name length should be lower than 30.")]
    public ReactiveProperty<string> Name { get; }

    public ReadOnlyReactiveProperty<string> NameErrorMessage { get; }

    public ViewModel()
    {
        // Add IgnoreInitialValidationError flag
        Name = new ReactiveProperty<string>(mode: ReactivePropertyMode.Default | ReactivePropertyMode.IgnoreInitialValidationError)
            .SetValidateAttribute(() => Name);

        // Handling an error message
        NameErrorMessage = Name.ObserveErrorChanged
            .Select(x => x?.OfType<string>()?.FirstOrDefault())
            .ToReadOnlyReactiveProperty();
    }
}
What's different between Skip and IgnoreInitialValidationError?
In the IgnoreInitialValidationError case, the ReactiveProperty class doesn't report an error of initial value.
In the Skip case, it just ignores the error event.
This difference is important on the supported platform of INotifyDataErrorInfo like WPF.
Skip approach will be fed back to the UI by a red border.
IgnoreInitialValidationError approach does not feed back to the UI.
# The mode of ReactiveProperty
ReactiveProperty class calls the OnNext callback when Subscribe method called.
var x = new ReactiveProperty<string>("initial value");
x.Subscribe(x => Console.WriteLine(x)); // -> initial value
You can change this behavior when a ReactiveProperty instance is created.
the constructor and ToReactiveProperty methods have ReactivePropertyMode arguments.
They can be set to the following values.
ReactivePropertyMode.None- ReactiveProperty doesn't call the
OnNextcallback whenSubscribemethod is call. And calls theOnNextcallback if the same value is set.
- ReactiveProperty doesn't call the
ReactivePropertyMode.DistinctUntilChanged- This doesn't call
OnNextcallback if same value set.
- This doesn't call
ReactivePropertyMode.RaiseLatestValueOnSubscribe- This calls
OnNextcallback whenSubscribemethod call.
- This calls
ReactivePropertyMode.Default- It is default value. It is same as
ReactivePropertyMode.DistinctUntilChanged | ReactivePropertyMode.RaiseLatestValueOnSubscribe.
- It is default value. It is same as
ReactivePropertyMode.IgnoreInitialValidationError- Ignore initial validation error.
If you don't need this behavior, then you can set ReactivePropertyMode.None value.
var rp = new ReactiveProperty<string>("initial value", mode: ReactivePropertyMode.None);
rp.Subscribe(x => Console.WriteLine(x)); // -> don't output value
rp.Value = "initial value"; // -> initial value
# ForceNotify
If want to push the value forcibly, then can use the ForceNotify method.
This method pushes the value to subscribers, and raise a PropertyChanged event.
var rp = new ReactiveProperty<string>("value");
rp.Subscribe(x => Console.WriteLine(x));
rp.PropertyChanged += (_, e) => Console.WriteLine($"{e.PropertyName} changed");

rp.ForceNotify();
Output is as below.
value                  # first subscribe
value                  # by the ForceNotify method
Value changed          # by the ForceNotify method
# Change comparer logic
Can change comparer logic by the equalityComparer argument of constructor and factory methods.
For example, ignore case comparer:
class IgnoreCaseComparer : EqualityComparer<string>
{
    public override bool Equals(string x, string y)
        => x?.ToLower() == y?.ToLower();

    public override int GetHashCode(string obj)
        => (obj?.ToLower()).GetHashCode();
}

// Constructor
var rp = new ReactiveProperty<string>(equalityComparer: new IgnoreCaseComparer());
rp.Value = "Hello world"; // change to "Hello world" from null
rp.Value = "HELLO WORLD"; // don't change
rp.Value = "Hello japan"; // change to "Hello japan" from "Hello world"

// Factory method
var source = new Subject<string>();
var rp = source.ToReactiveProperty(equalityComparer: new IgnoreCaseComparer());
source.OnNext("Hello world"); // change to "Hello world" from null
source.OnNext("HELLO WORLD"); // don't change
source.OnNext("Hello japan"); // change to "Hello japan" from "Hello world"
# ReadOnlyReactiveProperty class
If you never set Value property, then you can use ReadOnlyReactiveProperty class.
This class can't set the property, and other behavior is same ReactiveProperty class.
ReadOnlyReactiveProperty class is created from ToReadOnlyReactiveProperty extension method.
See below.
public class ViewModel
{
    public ReactiveProperty<string> Input { get; }

    // Output never set value.
    public ReadOnlyReactiveProperty<string> Output { get; }

    public ViewModel()
    {
        Input = new ReactiveProperty<string>("");
        Output = Input
            .Delay(TimeSpan.FromSeconds(1))
            .Select(x => x.ToUpper())
            .ToReadOnlyReactiveProperty(); // convert to ReadOnlyReactiveProperty
    }
}
# Unsubscribe
ReactiveProperty class implements the IDisposable interface.
When the Dispose method called, ReactiveProperty class releases all subscriptions.
In other instance's events subscribe, you should call the Dispose method at the end of the ViewModel lifecycle.
public class ViewModel : IDisposable
{
    public ReadOnlyReactiveProperty<string> Time { get; }

    public ViewModel()
    {
        Time = Observable.Interval(TimeSpan.FromSeconds(1))
            .Select(_ => DateTime.Now.ToString("yyyy/MM/dd HH:mm:ss"))
            .ToReadOnlyReactiveProperty();
    }

    public void Dispose()
    {
        // Unsbscribe
        Time.Dispose();
    }
}