# Getting start for Xamarin.Forms
# Create a project
- Create a Cross Platform app (Xamarin.Forms) project.
- Setting the
New Cross Platform Appdialog like following. Choose the .NET Standard project. Of course you can select shared project.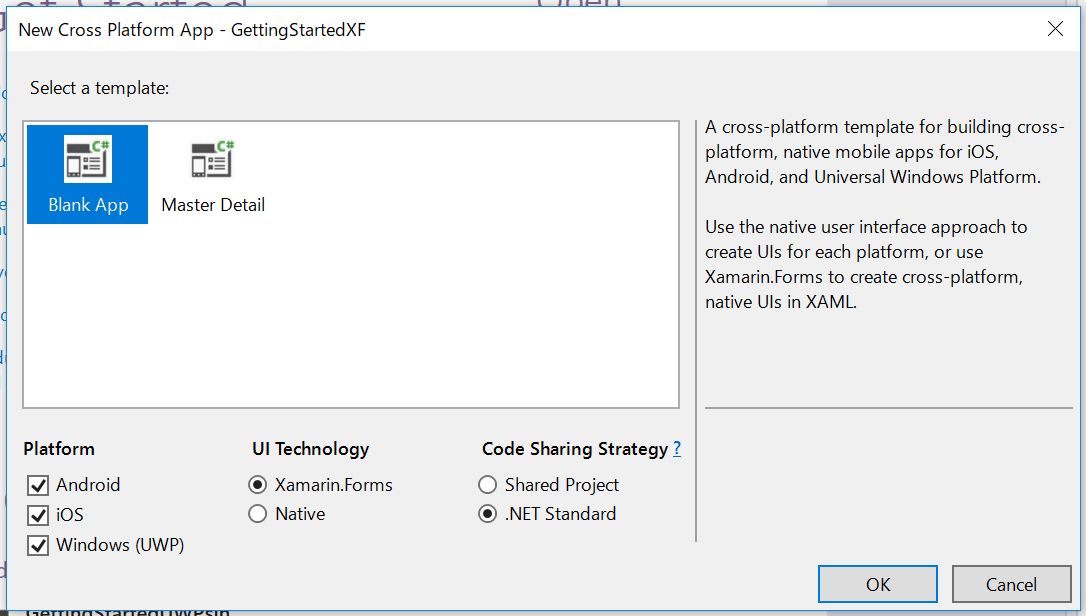
- Install ReactiveProperty to all projects from NuGet.
# Edit codes
- Create MainPageViewModel.cs to .NET Standard project.
- Edit file like following.
MainPageViewModel.cs
using Reactive.Bindings;
using System;
using System.Reactive.Linq;

namespace GettingStartedXF
{
    public class MainPageViewModel
    {
        public ReactiveProperty<string> Input { get; }
        public ReadOnlyReactiveProperty<string> Output { get; }

        public MainPageViewModel()
        {
            Input = new ReactiveProperty<string>("");
            Output = Input
                .Delay(TimeSpan.FromSeconds(1))
                .Select(x => x.ToUpper())
                .ToReadOnlyReactiveProperty();
        }
    }
}
MainPage.xaml
<?xml version="1.0" encoding="utf-8" ?>
<ContentPage xmlns="http://xamarin.com/schemas/2014/forms"
             xmlns:x="http://schemas.microsoft.com/winfx/2009/xaml"
             xmlns:local="clr-namespace:GettingStartedXF"
             x:Class="GettingStartedXF.MainPage">
    <ContentPage.BindingContext>
        <local:MainPageViewModel />
    </ContentPage.BindingContext>
    <StackLayout>
        <Entry Text="{Binding Input.Value, UpdateSourceEventName=TextChanged}" />
        <Label Text="{Binding Output.Value}" />
    </StackLayout>
</ContentPage>
# Launch the application.
After launching the app, you can see below window. The output value was displayed to upper case, after 1sec from the input.